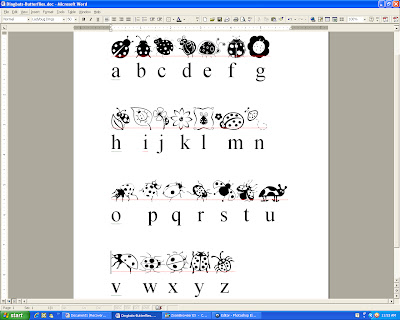
I'm still organizing (does it ever end?), and today I'm sharing how to organize your digital dingbats. (Can you say that 10 times fast?) For those of you unfamiliar, I'm not slinging insults! Dingbats are the characters that are in fonts that aren't letters or numbers. On free font websites, there are many, many fonts that are solely dingbats. The dingbats come in so many different types and themes - flowers, sports, holidays, animals, bugs...the list goes on and on.
In a time period I can only refer to a B.S. (Before Silhouette), I used dingbats occasionally when making a sign or letter in Word. Then, about a month A.S. (After Silhouette), when playing around in my Silhouette software, I realized that the dingbats were tiny little pictures that the Silhouette would cut for me. Literally thousands of pictures. For free. Now, I know some of you are probably thinking, "Duh, Andreana." I know. I thought the same thing to myself. But it was only by accident, that when fiddling with what font I wanted to use, the Microsoft dingbat font popped a picture of a boat onto my screen, and the lightbulb went off in my head. (My lights aren't always automatic, sometimes that switch gets stuck!).
We ALL like free digital pictures, don't we? Even without a Silhouette, I can't imagine this wouldn't work with another digital cutter that is linked to the computer (I've never seen MTC or SCAL used with a Cricut, but I know you can use it to cut fonts with the Cricut). You can even do the old-fashioned print and cut with scissors or a craft knife. Using dingbats opens up so many digital cutting doors!
The one problem is, that it's hard to know exactly what pictures are on each dingbat. And which picture corresponds with which key on the keyboard (Dingbats have different pictures for capital letters than lowercase, some have fewer than others, etc.). So I decided to make myself some cheat sheets.
Here's what I do after downloading a new dingbat font.
Go into Word and open a new blank document. Make my font size larger (usually around 50) and type the first 5 letters of the alphabet twice (one right below the other):
Then select the upper row of letters, and change that font to the dingbat font.
Now, you make it look pretty. Space the lower row of letters to be directly below the corresponding dingbat image.
Continue on, until you have not only done the entire lower-case alphabet, but the upper as well, and the dingbats are all shown with their corresponding letter.(Note that not all dingbats will have that many images. For example, this ladybug dingbat font only has corresponding images through capital "W".)
Save that document, print it out, and stick it in a plain old 8.5 X 11 page protector and 3-ring binder. Now they can be grouped by theme or alphabetically, or whichever way you'd like. So easy to flip through and find what you need!
I found this dingbat font ("My Ladybug Dings") on dafont.com, when I was searching for a ladybug to use on a layout. I just opened up a textbox in the Silhouette Design Studio and typed in the letter of the ladybug that I wanted:
Here's the finished layout of my sweet girl that I made using these digital dingbats, my Silhouette, and the fabulous girly Bella papers that you can actually go steal on CraftySteals today! I love these bright papers - they are perfect for spring (I'm sure there are some egg hunt pictures you'll have after today!) and summer fun pictures too! The boy ones are equally adorable too!)
Hope this was helpful for you! I'm always on the lookout for cheap or free cutting files - if you know of any great places to find them, be sure to share!
Whether you are celebrating Easter by going on an egg hunt or having a special dinner - or just enjoying your day, have a wonderful Sunday!


What a great idea! thanks for sharing!
ReplyDeleteI have free Inkscape and AI templates to do this quickly.
ReplyDeletehttp://cleversomeday.wordpress.com/2010/02/17/character-map-template/
There is also an online tool here
http://www.beckymelton.com/dingbatmap.htm
Love that layout!