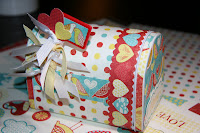
A few years ago, I heard about people altering small metal mailboxes for Valentine’s Day. I thought it was an adorable idea (what kid or adult doesn’t like getting love notes?). Well, I never could find any of those little mailboxes! Empty spots on the shelves, yes! The actual mailboxes, never! I made a mental note to keep my eye open, and last week, when I was running into my favorite big-box store, I saw a full basket of little metal mailboxes – for a dollar! I picked up a few to experiment with. For a dollar, what could I lose?
So, I sat down last night with my husband, and while we watched Exit through the Gift Shop Door (pretty interesting documentary about street art, that was on the Dallas Morning News list of Top Ten Movies of 2010), I knocked out two mailboxes. I could have done a few more, but I ran out of adhesive – yes, I know, what kind of crafter am I to run out of adhesive?
Here’s how I did it, if you want to try it out.
1. First, I picked out two pieces of coordinating patterned paper. For my daughter’s box I used My Mind’s Eye’s Love Me Do (still available on the Past Steals page. Next, I measured the width of my mailbox (in between the ridges on each end) – which turned out to be a little less than 4”. A strip of 4” by 12” was the right size to wind entirely around the mailbox.

2. This is the trickiest part. I took the strip of paper and held it on top of the mailbox where the flag is attached to the mailbox. I pressed the paper down a little so that the head of the rivet attaching the flag to the box made an indentation. I then cut a slit in the side, and a circle around the indentation, about ½ inch in diameter.

3. Using glue dots (I am sure another adhesive might be easier to work with, but with my limited stock, I just stretched the glue dots into a line and they worked perfectly), I adhered the to the mailbox, sliding the paper around the flag.
4. Next up, were the lids of the mailbox. I took both lids off, traced them on the coordinating paper, cut them out and adhered them with the Glue Dots.

5. The last uncovered space was the perimeter of the lids. It’s a very small width and could be left plain. I thought about putting ribbon around it, but I decided to use more of the gorgeous MME paper. Using the lid, I measured the width of the lip, and then cut a strip that size to wind around the entire lid. Again, adhering with glue dots. (you know, now that I think about it, even if I did have any other adhesive, I probably still would have chosen Glue Dots. Those things are awesome).
6. Then I embellished the flag with some American Craft ribbons, and fancied up the mailbox with more paper strips and die-cuts from the Love Me Do paper pack.

For my son’s mailbox, I chose some paper from the American Crafts Junior Collection. It's also a Past Steal– and can I just say that this kit is AWESOME! It is LOADED with stickers, stamps, thickers, rub-ons, ribbons and perfectly BOY double-sided paper! I’m using it for my son’s upcoming birthday party invitations and favor bags as well!. He’s such a sports nut (he would like to actually change his middle name to “Sports”), so I thought he would appreciate a basketball mailbox a wee bit more than one covered in hearts. (And I was right – he saw it on a shelf the next morning and wanted to know if he could have it! :)) Oh, and if you are wondering about the "E-Dawg", it's my son's nickname that his dad (and our male friends) gave to DS as a baby. I guess he needed a "manly" nickname to be part of the crew.

These mailboxes are so adorable and ridiculously easy. So easy, that I'm now pondering making one for each of my kids’ teachers to “deliver” a giftcard or two (either now or at the end of the school year). These could be made for Mother’s Day, birthdays, or even as a suggestion box for your office! The possibilities are endless!
Happy crafting! Please don’t forget to check out the Past Steals page – there are some awesome treasures that you may have missed the first time around!!


Cute! I found a bunch of these at Target, and our girl scout troop will decorate them for their Valentine's craft. I need to stock up, because these are good for gifts at any time of year!
ReplyDeleteGreat crafts for kids!
ReplyDeleteCUTE!!
ReplyDeleteLove that movie, too! We think the French guy's art is all really by Banksy, though!
ReplyDelete