Friday, April 29, 2011

Feature You Friday - Fidel Caps

Good morning CraftyStealers!

Today, we are featuring our very own Mrs. CraftySteals herself, Stephanie!  We wanted to show you all of the fabulous caps she has created using with today's CraftySteal, Alternative Apparel Fidel Caps.  You can paint them, bling them, use heat transfer or sew on them. The sky's the limit with the different ways you can put your signature on these caps!

As an added bonus, Alternative Apparel is an company concerned not only with the environment, but making the people who work with and for them are treated fairly in the making of their products.  You can feel good about "stealing" caps made by this company!

Here's a few of the caps Steph has made so far (also using the Silhouette Fabric Interfacing)


Cute, right? These caps are adorable on, (and a life-saver when you wake up late but still have to drop your kid off at school!) Go get yours at CraftySteals before they are gone!

Happy Crafting, and make sure to check out CraftySteals tomorrow - it's National Scrapbook Day soon and we'll be celebrating with a special deal!
 
Would you like to be featured on a future “Feature You Friday”? It’s a great way to show off your skills, share your talents, or promote a business, blog or cause that’s dear to you.  All you need to do is send us a photo (or photos) of a project (layout, card, altered item, your imagination is the limit!) to the CraftySteals blog at blog@craftysteals.com.  If you are chosen, your work (and links) will be seen by all of our CraftySteals Blog readers and Facebook fans.  Submit your photos today – we can’t wait to see what you have come up with!

Tuesday, April 26, 2011

What should I do with Pebbles Chips? (Mother's Day and Teacher Appreciation ideas inside!!)

Good morning CraftyStealers!

I just thought I'd drop by with some ideas for using your Pebbles Chips! Today's steals give you two bundles to choose from!  You'll probably want both after you are done looking at the photos below!  The Pebbles Inc. blog is a wealth of ideas for your Pebbles Chips - the design team over there is incredibly creative!

Here are a few of the things you can make with the MEGA bundle of Pebbles Chips from CraftySteals:

A mirror, perfect for a kid's room OR make it in school colors for your child's teacher: (Here's a link to the tutorial):
And of course layouts and cards galore!


And with the Mini Bundle? (This one includes chips from the Treehouse, Twitterpated and May Bouqet lines)

An adorable MOTHER'S DAY gift (it's coming up on the 8th!)
 A fun gift for a child or teacher (Teacher Appreciation is NEXT WEEK folks!)
Or Spring cards and layouts:
 
See, I told you you'd want both!! If you haven't already checked out CraftySteals today, run and get yours before they are gone! (And if you want to see more Pebbles Chips ideas, just head over to their blog for more inspiration!)

Happy Crafting!

Sunday, April 24, 2011

Sunday School: Organizing Digital Dingbat Files

Good morning CraftyStealers!

I'm still organizing (does it ever end?), and today I'm sharing how to organize your digital dingbats.  (Can you say that 10 times fast?) For those of you unfamiliar, I'm not slinging insults!  Dingbats are the characters that are in fonts that aren't letters or numbers.  On free font websites, there are many, many fonts that are solely dingbats.  The dingbats come in so many different types and themes - flowers, sports, holidays, animals, bugs...the list goes on and on. 

In a time period I can only refer to a B.S. (Before Silhouette), I used dingbats occasionally when making a sign or letter in Word.  Then, about a month A.S. (After Silhouette), when playing around in my Silhouette software, I realized that the dingbats were tiny little pictures that the Silhouette would cut for me.  Literally thousands of pictures. For free.  Now, I know some of you are probably thinking, "Duh, Andreana."  I know.  I thought the same thing to myself. But it was only by accident, that when fiddling with what font I wanted to use, the Microsoft dingbat font popped a picture of a boat onto my screen, and the lightbulb went off in my head.  (My lights aren't always automatic, sometimes that switch gets stuck!). 

We ALL like free digital pictures, don't we? Even without a Silhouette, I can't imagine this wouldn't work with another digital cutter that is linked to the computer (I've never seen MTC or SCAL used with a Cricut, but I know you can use it to cut fonts with the Cricut).  You can even do the old-fashioned print and cut with scissors or a craft knife.  Using dingbats opens up so many digital cutting doors!

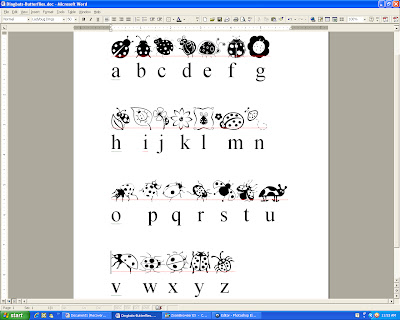
The one problem is, that it's hard to know exactly what pictures are on each dingbat.  And which picture corresponds with which key on the keyboard (Dingbats have different pictures for capital letters than lowercase, some have fewer than others, etc.).  So I decided to make myself some cheat sheets.

Here's what I do after downloading a new dingbat font.

Go into Word and open a new blank document. Make my font size larger (usually around 50) and type the first 5 letters of the alphabet twice (one right below the other):
 Then select the upper row of letters, and change that font to the dingbat font.
Now, you make it look pretty.  Space the lower row of letters to be directly below the corresponding dingbat image.  
Continue on, until you have not only done the entire lower-case alphabet, but the upper as well, and the dingbats are all shown with their corresponding letter.(Note that not all dingbats will have that many images.  For example, this ladybug dingbat font only has corresponding images through capital "W".)
Save that document, print it out, and stick it in a plain old 8.5 X 11 page protector and 3-ring binder.  Now they can be grouped by theme or alphabetically, or whichever way you'd like.  So easy to flip through and find what you need!
I found this dingbat font ("My Ladybug Dings") on dafont.com, when I was searching for a ladybug to use on a layout.  I just opened up a textbox in the Silhouette Design Studio and typed in the letter of the ladybug that I wanted:
Here's the finished layout of my sweet girl that I made using these digital dingbats, my Silhouette, and the fabulous girly Bella papers that you can actually go steal on CraftySteals today! I love these bright papers - they are perfect for spring (I'm sure there are some egg hunt pictures you'll have after today!) and summer fun pictures too! The boy ones are equally adorable too!)
Hope this was helpful for you! I'm always on the lookout for cheap or free cutting files - if you know of any great places to find them, be sure to share!

Whether you are celebrating Easter by going on an egg hunt or having a special dinner - or just enjoying your day, have a wonderful Sunday!

Friday, April 22, 2011

Feature You Friday: Recycled Cards

Good morning CraftyStealers!

Happy Earth Day! For 41 years, Earth Day has been a reminder to all of us that we need to take care of our planet - and take action to ensure that our resources will continue to be here for future generations.

In keeping with that idea, I thought today that we should "feature" a way for all of the people who like to play with paper, to get involved.  Here's what I came up with.  Recycling card fronts. 

Even if you do not make cards, I can bet you have received them.  Lots of them.  And if you are anything like me, you save them.  I tend to save all cards right after holidays and birthdays and then purge them into the recycling bin about two years later. (I'm not a hoarder, just sentimental - or that's what I tell myself!).  After December, which includes Christmas, my daughter's birthday, husband's birthday, and my wedding anniversary, I had a huge stack of cards.  So I went searching for something better to do with them than the recycle bin.  I found St. Jude Children's Ranch. 

St. Jude Children's Ranch (not to be confused with the also fantastic and worthy St. Jude Children's Research Hospital) is a place where abused, abandoned or neglected children are cared for and helped to heal.  There are three locations - one in Nevada, two in Texas.  It is a non-profit, non-sectarian home for children of all races and faiths. 

St Jude's Children's Ranch has a recycled card program.  The children take donated card fronts (for all occasions), and turn them into cards for resale.  All you have to do is mail in the fronts of those cards and you will be giving them new life!

Here are the details for donating cards (taken from the St. Jude Children's Ranch website):

To Donate Cards:

We welcome your donation and ask that you please review the below tips before sending your donation. Currently, we have found the least expensive way to mail large quantities of card donations is through the USPS in a Flat Rate Box which holds up to 70 pounds (available at the Post Office).

Card Donating Tips:
All types of greeting cards, including Christmas are used.
  • Only the card front can be used (please check to be sure the back side is clear of any writing, etc.)
  • We can not accept Hallmark, Disney or American Greeting cards.
  • 5" x 7" size or smaller is preferred.
Mail donations to : St. Jude's Ranch for Children
Recycled Card Program
100 St. Jude's Street
Boulder City, NV 89005

What a great way to help the earth, help others, and make sure those gorgeous cards that we know people spent either time, money or energy on, don't go to waste!

If you'd like to look for an Earth Day event near you, please visit the Earth Day Network website.  Or, with a busy weekend ahead for many of you with many of us celebrating Good Friday and Easter as well, you can make a "green" pledge - and be part of the "Billion Acts of Green."

We even have an earth-friendly CraftySteal going on today! The K&Co Amy Butler stamps are in post-consumer waste recycled packaging that has designs and words printed on it - also making it REUSABLE! So with a clear conscience, go check out these gorgeous stamps that are perfect for spring projects!
Have a wonderful weekend and feel free to share with us any other ways you are getting "green" today!


Would you like to be featured on a future “Feature You Friday”? It’s a great way to show off your skills, share your talents, or promote a business, blog or cause that’s dear to you.  All you need to do is send us a photo (or photos) of a project (layout, card, altered item, your imagination is the limit!) to the CraftySteals blog.  If you are chosen, your work (and links) will be seen by all of our CraftySteals Blog readers and Facebook fans.  Submit your photos today – we can’t wait to see what you have come up with!

Sunday, April 17, 2011

Sunday School: Custom Stamp and Small Sticker Storage

Good morning CraftyStealers! 

It's back to organizing this week! Since the beginning of my craftroom "Mission: Organization", I have been working my way through my supplies.  First it was scrap storage, then punch storage, and now I am moving on to clear stamp storage. 

I have not been much of a stamper in the past, but am loving all of the stamping creations that I have seen lately here and all over company design team blogs.  So of course, I have started "collecting" clear acrylic stamps (I can't with any sincerity say I am using them much yet).  My collection is small, but even my little collection is outgrowing the box I was storing them in. Plus, I can't see what I have easily.  Needless to say, it was NOT going to do the trick. 

I have seen special notebooks at various craft stores specifically made for stamp storage, but I thought that the idea was simple enough to try to recreate at home for a fraction of the cost.  It turned out to be even easier than I had orginally thought (and cheaper, since I had everything except the thread at my house already).

Here's what you'll need:
  • Old or inexpensive album (I used an old 8 X 8 postbound album)
  • Cheap page protectors
  • Polyester (clear) thread
  • Ruler
  • Dry erase marker
  • Cutter or Craft knife/self-healing mat
  • Sewing machine 
Take the stamps/embellishments (these adorable stamps below are from the American Crafts Junior Collection kit - there are a few left on the Past Steals page) and lay them down how you would like them to fit on the page.  With the dry erase marker, draw hash marks to form squares or rectangles around your stamps/embellishments, making sure to leave ample room around the edges (this will make it easier to take things in and out).
With the ruler, connect the hash marks (these will be your "sew" lines).  You will also need to draw "cut" lines.  In this example, the top is open already, but I would like the bottom "pocket" to open from the right side. So draw a line on the right (make sure to make it a little longer than the exact length of whatever is going into the pocket for easy in and out).
Now, with the cutter (or craft knife), cut along the cut line (there is only one on this example).  You want to cut all the way through both layers of plastic. 
Now you are ready to sew!  If you'd like to have a background (sometimes it will help you see your stamps better - and can also be used as a divider to put stamps on the backside), you can put a piece of paper into the page protector at this point.  The paper will serve as a divider.  In this particular pocket, I left it out.  Using your clear thread, sew straight lines along the divider lines you drew.  Wipe off the dry erase marker with a paper towel.
Voila! Custom storage.
Here is another example of a different set of stamps.  I left the paper in when I made these pockets, as there were quite a few stamps in the collection and I wanted to store the others on the back pockets.
This kind of storage makes it SO easy to store collections together by manufacturer and/or by theme! You can move aroud pages and add more in as needed. It is easy to flip through and see all of your fabulous choices too.

As an added bonus, you can also use this same method for making custom coupon organizers! I'm no "Extreme Couponer", but it would be nice to have an easy small notebook to keep in the car for restaurants and various store store coupons that are too big for the usual coupon organizers.  (By the way, has anyone caught the new Extreme Couponing show on TLC yet?  Those savings are insane - but what do you really do with 60 bottles of Maalox? Check it out if you haven't yet!)

Have fun organizing your stamps, stickers (and maybe even some coupons)!

Friday, April 15, 2011

Feature You Friday: Paper Mobile by Carly

Good morning, CraftyStealers!

Today we have a little something fun for you! We are featuring your fellow CraftyStealer Natasha's paper mobile. 
I'm Carly Lucier from Windsor, ON and I'm 20 years old. I have always enjoyed crafting, but my passion started about two years ago when I was looking up origami crane instructions and instead found these origami star-ball instructions!  I started out selling just the balls at Made In Windsor Crafters Markets. A few people suggested that I use the star-balls to make mobiles, so I did!
For this project, Carly used her American Crafts Valentine's ribbon CraftySteal.
Cute, right?  I'm thinking this project has so many possibilities beyond a baby's room decoration!  Depending on the paper, it could be a solar system or sports balls for bigger boys, transformed into flowers or butterflies for a little girl, or a great holiday decoration for any season - you could even make a very cool Christmas tree covered in handmade origami ornaments!  If you'd like to see more or purchase one of Carly's origami creations, go check out her Origami Mobiles Facebook Page.  Thanks again for sharing, Carly!

Have any projects you'd like to share? Have an Etsy or Ebay business you want everyone to know about? Or maybe a crop or cause you'd like to get the word out about? Send in your submissions to the StitchSteals blog for consideration for future Feature You Fridays.  We'd love to share your talents with all of your fellow CraftyStealers!

Have a fabulous start to your weekend. Happy Crafting!

Tuesday, April 12, 2011

Glue Arts + Crafty Steals = Endless Possibilities

Good morning CraftyStealers!


We've got another new vendor making their debut at CraftySteals today.  We are thrilled to welcome Glue Arts! Glue Arts makes a variety of adhesives (all assembled in the USA, by the way), including this big, beautiful refillable tape runner, the Glue Glider Max:


Does anyone else use those little, disposable tape runners? I'll raise my hand! When I started using them, I thought they were the best thing since sliced bread - no sticky glue mess, no warped papers, super fast to use.  But, those little suckers also have a few drawbacks.  First, they don't always have the best adhesive - sometimes the "stick" is not so sticky.  There have been a few instances when I come back to a page or project, and the papers (or especially chipboard pieces) have come loose or fallen off!  Another issue, is that those little tape runners seem to run out very quickly (and they aren't too cheap to keep replacing!)


The Glue Glider Max solves those problems.  The refill cartridges have up to 114 feet of tape! (That will take even me a while to use up and is more cost effective than buying the little guys).  There are also 6 different kinds of cartridge refills depending on your needs (they are either 1/2" or 1" wide and come in perma tac or repositionable adhesive strength).  The perma tac tape means your projects will stay where you put them!


I recently got my hands on the Glue Glider max, and was excited to take it for a test drive.  As part of my office reorganization, I want to revamp my bulletin board (and let's face it, make the whole place more fun to be in).  My current bulletin "board" is an old frame surrounding cork squares that are covered in scrapbook paper.  It's WAY too small for my needs as you can see (well, kind of see - sorry the picture is so dark).  I wanted to be able to separate my work papers from my personal papers - so I decided to make two boards.
Using the Glue Glider Max, some fun Riley Blake material (a past steal from StitchSteals.com), cheap page protectors, and some ribbon, I was able to get make exactly what I need in about an hour (including paint drying time!)
I started with two plain bulletin boards and painted them both black - to match my office colors.
Then I measured the board and cut two rectangles of fabric to cover the surface of the corkboard.
Using the Glue Glider Max (this cartridge has 1" perma tac tape), I ran a strip around the edge of the board, pressed the fabric down, and trimmed the edges.
Next, I wanted to add a little customization and put a pocket in for a calendar.  Working with a 12 X 12 page protector, I placed a piece of paper in for reference, and cut the page protector down to size.
Then I used the Glue Glider Max to run a piece of tape around the edges and placed it on my fabric.  (I know you can see the tape through the page protector, but only when it is empty - which it won't ever be!).  Are you wondering why I don't just pin the calendar to the corkboard? The page protector lets me write on it with a dry erase marker to make any changes without having to reprint a whole new calendar!
I finished it off with a ribbon for a trim around the edge (using the Glue Glider Max to adhere it of course!)
Here's how my boards look now:
If you'd like to see the Glue Glider Max used in even more crafty ways, check out what they are making over at the Glue Arts blog.


Before you run over to get today's Glue Glider CraftySteal, I want to list a few suggestions for use that are listed on the packaging for Glue Glider Max beyond papercrafts:
  • Picture framing
  • Hold rugs and shelf paper in place
  • Reattach fencing/trellises
  • Bond fabrics and attach crown molding
  • Attaching weather-stripping and insulation
Those are just a few among dozens of others! With all of those possibilities, you might want to get two because your husband might try sneaking yours out of your craft stash and he'll be needing his own for a Father's Day suprise :)


And, because I am nothing if not an enabler, go check out today's StitchSteal if you like to play with fabrics - it's a Glue Glider Pro with Fabric Bond adhesive! (You can also check out the pillow I made using my Silhouette Heat Transfer and the Glue Glider Pro with Fabric Bond at the StitchSteals blog).


Have a great day, and Happy Crafting!

Sunday, April 10, 2011

Giveaway Winner....

First off I just wanted to say THANKS to everyone who shared the button! We are getting closer 20,000 and it would not be possible without you all sharing the CraftySteals love!

We are pleased to announce the HUGE prize pack goes to....

29. 4kids4 said...

I just posted your button on my blog http://inthebigbluehouse.blogspot.com

Whoo hoo...thanks for the chance to win some goodies!

~Sharon C.

Sunday School: Make your own art - die-cutter style!

Good morning CraftyStealers!

Did you know that April is National Decorating Month? I didn't, but it is! In honor of that, I decided to finally decorate my bedroom walls.  The initial idea was to paint.  When I say "initial", we are talking last YEAR's idea.  I have had paint chips of varying shades of blue on my wall since last summer.  I even went so far as to buy a paint sample, but never painted the wall.  It seems as if the bigger my kids get, the more I have to referee, which means less time to actually get anything done.

So I decided to take the easy way out.  A few months ago, I had seen a tutorial on how to use your Silhouette to make wall art with some vinyl as a stencil, and some spray paint.  So, I went out and got three large canvases, grabbed my paint sample and some Silhouette vinyl, fired up the Silhouette and got to work. 

First, I picked my shape from the Silhouette store.  I had a certain flower in mind - something like a mum.  Using the search feature, I ended up finding this great shape. (As an added bonus, most designs in the Silhouette store are only $.75 until today, April 10th).   If you are even just considering buying a Silhouette, you can start collecting images now - there is a free image every Tuesday and free files all over the internet - all you need to do is download the free Silhouette software to get started! After isolating and enlarging my flower, I cut it out in black vinyl.  I was going to use the vinyl as a stencil, but decided that it would be easier (and MUCH faster) to just use the actual vinyl on top of the canvas.  So I went ahead and cut my flower out in white vinyl as well, and in two different sizes.
I painted all three of my canvases.  I love to paint with real acrylics, but since I wanted a custom color and enough to cover 3 canvases, I went cheap and spent the $4 at the hardware store (well, last June I spent the $4) instead of more at the art supply store on actual acrylic paints.  You could even use spray paint.
Then I picked a font (I went to dafont.com and downloaded "Doris Day") for my words ("All you need is love") and cut those letters out in black vinyl.  A tip for those of you who don't like to waste much vinyl (I'll straight up admit to being frugal!) is to isolate each letter and try to move them around and take up the least amount of space on the vinyl sheet as possible (it's a little like a puzzle).  For example, my sentence should have been about 20" long, but I only used about 6" of vinyl. Obviously, you have to place each letter individually and can't use transfer paper, so it only makes sense for smaller word phrases.
All that was left was to stick them on exactly where I wanted them, and hang them on the wall...(sorry for the poor quality photo, my bedroom doesn't get much natural light!)
I LOVE the look, and the first person who saw them asked where I got them! When I explained, my friend said she couldn't tell they weren't real paintings! 

Now, you can definitely do the same thing with another die-cutter - Cricut, Slice, etc. You can even print out your designs and cut them out of vinyl (using your printed page as an overlay, tape it to your vinyl and cut out the design with an craft knife).  However, I do have to say that the more I use the Silhouette, the more I fall in love.  There are so many ideas floating around in my head!  In fact, I have another decorating project using the same flower and the Silhouette heat transfer that I'm hoping to share with you in the next couple of days!

I hope you all have a great afternoon!  Perhaps you can get started on (or finish up) a home decor project at your house too.  And if you need some inspiration to get going, go check out the Simply Handmade idea book on CraftySteals today - it might be just what you need!